
One of the most unpleasant surprises about being a homeowner is home repair, and we’ve been unfortunate enough to have had to deal with some of the most expensive home repairs that we didn’t see coming!
Indeed, our experiences have told us that any single major home repair (let alone having a bunch at the same time) can break the bank, and in our case, we have actually taken out a loan once we’ve realized what we were dealing with.
Are we just unlucky, or is this something that every homeowner has to deal with sooner or later?
And since we try to take a more preventative posture to our home maintenance situation, imagine how much worse the costs would have been had the issues gotten out of control and resulted in multiple major repairs?!?
So in this write-up, we leverage the benefit of hindsight to share our most expensive home repairs and maintenance issues, where for each of the issues, we provide lessons learned regarding:
- what the signs or symptoms are
- how we could have prevented it (or at least mitigate it since not everything is preventable)
- how much the issue has (or could have) costed us
Hopefully, you can leverage what we share here to give you a sense of what the true cost of homeownership is, which might better prepare you for what’s to come.
By the way, we focus this write-up on our firsthand experiences in Southern California, where our climate is typically hot and dry (though we do have bouts of saturation rains).
It’s worth noting that our destabilizing climate continues to push us to either extreme of fires or floods, and such extremes tend to undermine any long term assumptions we may have had when we bought our home in the first place.
Moreover, note that the prices that we show indicate how much we’ve paid for our repairs at the time, but realize that this can easily go up over time due to inflation, supply chain issues, and other factors out of our control.
1. Foundation Repair

The notion of having a solid foundation permeates every aspect in life regardless of whether we’re talking about corporate culture, child development, education, team building, etc.
Well, all of those analogies were rooted in the visualization of building massive structures (like skyscrapers) on top of a solid foundation, and in our context, that structure is a house (though it can apply to any kind of building)!
If the foundation is weak or it’s prone to moving, then no matter how well-built your home is, it’s going to come apart with the crumbling foundation.
If the foundation is solid, then it should limit your home repair issues to just the structure itself.
As Southern California residents, this is especially important because we have to deal with frequent earthquakes.
And this becomes an even more important issue if your home is on a hillside or mountain, where having a robust foundation is paramount to keeping your home from sliding down that hillside or mountain!
Signs Or Symptoms

So how do you know if you’ve got foundation repair issues that need to be addressed?
Generally, you’ll want to look for things like…
- sloping and/or uneven floors
- cracks showing up around the house
- bowing or warping walls
- doors and/or windows not fitting the frame
- doors and/or windows not opening and closing properly
We’ve had personal experience with this during a home remodel when we noticed cracks in our floor tiling as well as the brick facade showing a widening separation.
It turned out that there were cracks in the concrete slab beneath our house that appeared to be moving (once we lifted the floor tiles to investigate), but the mitigation measures varied widely depending on the vendors that we spoke to.
Prevention

So what causes foundation problems in the first place and how do you repair them?
To make a long story short, the name of game here is to control the moisture of the soil that is holding up the concrete slab that makes up your home’s foundation.
Failure to control the soil moisture means that the foundation could be subject to bowing or other torsional (twisting) forces that could ultimately cause the foundation to crack and ultimately split.
If the soil is too dry (like in a drought, which we’re very familiar with here in the Los Angeles area), the soil will compact and sink from its more average settling level.
If the soil is too wet and muddy (which can happen with El Nino-type saturation rains), the soil becomes soft and could also cause movement beneath the foundation, especially if there’s an earthquake.
Of course, climate is not controllable (at least not locally), but you can control how the water moves around your house, which in turn could mitigate or exacerbate soil moisture issues beneath the foundation.
So things that we did to manage this problem were the following:
- Installed a Drip System to maintain soil moisture (though Soaker Hoses were also suggested)
- Installed Storm Gutters and Drains to move excess water quickly away from the house and to the street
- Cleared the storm gutters and drains periodically so excess water does not accumulate where it’s not supposed to
- We tried not to have loose soil or planters butting up against the house
- We removed (or at least redirected) sprinklers spraying on or close to the house, which saturated the ground there
- We addressed leaks in the sprinkler system, especially where they caused pools of water in the grass
Cost

We’ve had differing opinions about our foundation repair, where one vendor said that we didn’t have an emergency (and he didn’t feel like it was worth giving us an estimate).
However, we did have another vendor that did a much lengthier assessment trying to measure elevation changes (in inches) throughout the foundation.
That latter vendor estimated a cost of about $38,000 for a roughly 1200 square-foot home to do some hydraulic columns to make sure the entire perimeter of the concrete foundation was at a constant level.
By comparison, we’ve seen foundation repair costs range from $450 to $45,000 with the national average being closer to $4500.
So was the foundation repair vendor trying to fear us into spending more than what was necessary?
Only time will tell because we didn’t have the budget to eat that kind of cost (as of mid-2022), and we actually proceeded at risk without the deep digging (to the bedrock layer) and hydraulic work being done.
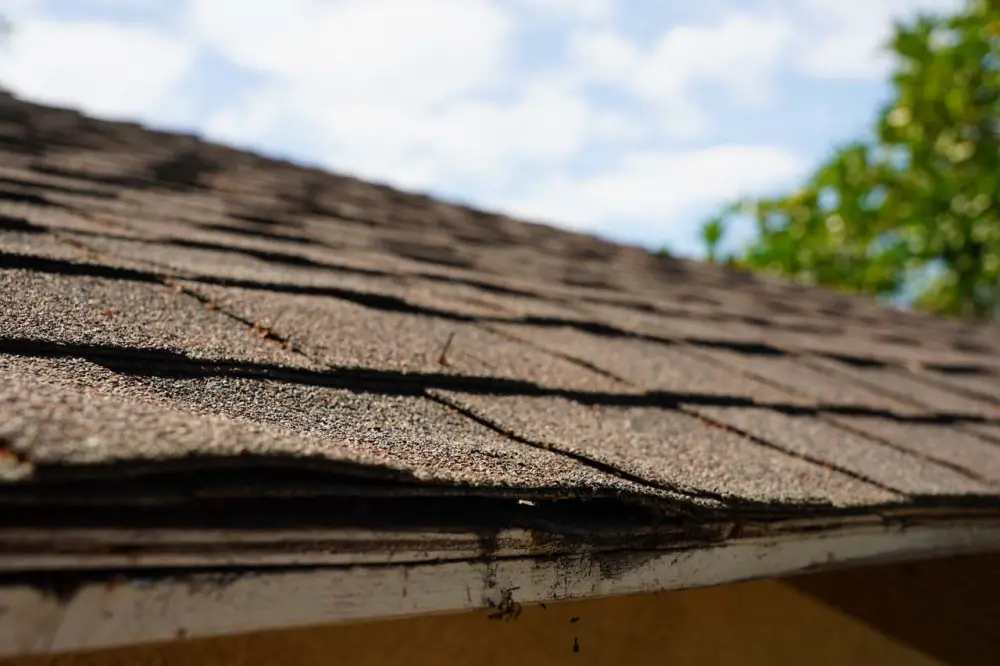
2. Roof Replacement Or Repair

The roof is probably the next most critical aspect of home maintenance and repair because it’s the part of the house that is the first line of defense against the elements.
After all, if you ever watch primitive survival shows like Naked and Afraid or Alone, then you know how important having a proper shelter is as the main survival priorities are shelter, fire, water, food (usually in that order).
Anyways, if the roof does not perform as it should, then you end up with leaks, which then introduces a whole slew of problems (most of which we’ve experienced and we’ll get into later on in this write-up).
Such complications resulting from water intrusion caused by poor roofing include mold, termite damage, higher energy costs, pest entryways, and more!
We’ve had experience with this issue largely because we knew we had to replace an old roof when we wanted to install solar panels.
However, we faced this issue again with a rental home where we debated whether to just make spot repairs or to just replace the whole roof.
We ultimately decided to re-roof to ensure that it wouldn’t cause us any problems for at least a few decades.
Signs Or Symptoms

Spotting roof issues that would require attention involves walking around the house (both inside and outside) and paying close attention to things like…
- discoloration or water stains in the ceiling, attic, and/or walls (sign of a roof leak)
- missing or bent flashings at the edges and corners of the base of the roof as well as chimneys and wall intersections
- missing, curling, or worn down (to the fiberglass) shingles or cracked tiles (if using tiled roofing)
- lifting nails that need to be tamped down
- water drips or puddles beneath the roof during a storm (a garage is a good place to spot this)
Every once in a while, as uncomfortable and messy as this can be, it’s worth carefully inspecting the attic for any signs of a leak up there.
It can be tricky though because there’s insulation, you have to walk on the beams (or else risk falling through the ceiling), and it’s very hot and dark up there.
However, I’ve learned that the most insidious problems are the ones you don’t see, and that attic can certainly hide roof leak issues until it’s too late.
Prevention
The best way to prevent roof issues from becoming major repair problems is to pay attention to it pretty regularly.
It’s recommended to have someone professionally inspect the roof about 10 years after installation, and about every 3-5 years after that.
However, you can also do your own bit of roof inspection in between those times to ensure nothing is emerging that might undermine the expected roof life.
Such unexpectedly emerging issues might include bad workmanship, extreme weather-related damage, vandalism, etc.
Other preventative measures to take for roof maintenance include:
- cleaning out clogged gutters (so water doesn’t back up into the roof)
- trim back (or cut down) trees with branches over or on the roof
- check for moss growth (could be sign of poor ventilation in the attic, which can be mitigated with more vents in the roof)
By the way, it goes without saying that if the roof job is done right with high quality materials, then it should last a very long time.
At a minimum, a new roof should last at least 15 years, and it’s not uncommon to see warranties go upwards of 30 years.
In our particular situation, we didn’t mess around and we used Owens Corning Platinum Certified installers, which carries an unheard of 50-year warranty on the materials and lifetime on the workmanship.
Cost

If you’re only doing spot repair of the roof, then the cost could be as little as a few hundred dollars or a simple do-it-yourself job.
However, you’ll have to live with the fact that if such repairs inadequately address the root causes of leaks or if the repair itself was shoddy and half-assed, then the complications could really blow up in your face.
We’re talking about complications like mold remediation, water-damaged or dry-rotted wood that termites can easily get into, and pest entryways (like rats).
Each of these things could result in tens of thousands of dollars in repairs not counting the inevitable roof replacement itself!
It’s kind of like you’re paying the full repair cost plus interest instead of doing it right the first time (which is actually true of any home repair or remodel).
Anyways, our roof replacement cost on our primary home was about $26k though this included a $6600 hidden cost of shiplap replacement due to termite damage (as of early 2021).
On another home, we paid about $18k, which didn’t have nearly as much wood replacement since it was a sturdier house built using the more fire- and termite-resistant redwood (as of mid-2022).
Both homes were single-family residences of roughly 1200 square feet of structure using shingle material.
I’ve seen roof replacement costs range from around $5,000 to $24,000 though I’ve seen the national average figure stated at around $8000.
Nevertheless, roof replacement costs vary widely depending on the type of roofing material (shingle vs. concrete vs. tile), the size of the house, and even the geographical region (where labor rates also vary significantly).
3. Water System Repair Or Re-piping

Water systems (primarily the plumbing aspect of it) is a big homeowner headache, and it’s largely because they tend to be very expensive to fix, especially as they tend to go undetected until it’s too late to contain.
If you haven’t figured out by now after seeing the first two expensive home repairs that we’ve cited in this write-up, water is actually the enemy when it comes to homeownership.
For once the water manages to escape the water system’s plumbing (whether by leak or rupture), then all hell breaks loose.
Get water on the wood (regardless of whether it’s the walls, the structures, or even the roof), and you’re bound to have toxic mold growth as well as rotting wood that invites pests, especially termites.
Get water on your floor, and you could find that mold might build up on your carpet, or rot your laminate or wood floors.
Yet water is so important for our day-to-day lives like…
- taking that relaxing hot shower
- having water to drink
- having water to cook
- washing hands
- brushing teeth
- doing garden work and/or landscaping
- doing cleaning (from laundry to the dishes), etc.
Indeed, you don’t want to mess around when it comes to the home’s water system.
It must be in good shape to properly move water throughout the house without letting the water get away from where it’s intended to go.
And if problems do inevitably occur, they better be addressed immediately or else deal with the consequences of even more expensive home repairs in addition to addressing the water system problem itself!
Signs Or Symptoms

Because there are multiple things that can go wrong regarding the overall water system, we really have to be vigilant about identifying and correcting problems as soon as they pop up.
Don’t wait until these problems get worse!
Such issues could manifest themselves as:
- water stains on the walls and/or ceilings
- musty smell (like what you would imagine a dungeon might smell like)
- bubbling or peeling paint on the walls and/or ceilings
- rust-colored water (could be a corroding steel pipe)
- fuzzy discolorations on the walls (could be growing mold or mildew)
- odd plumbing sounds
- damage or moisture on flooring
- unusually higher than normal water bill (sign of a leak or rupture)
- water meter spinning even if you turn off all water faucets (another sign of a leak or rupture)
- changes or sudden loss in water pressure (another sign of a leak)
- wood that can’t resist a screwdriver pushing against it (a sign the wood weakened or hollowed out)
Prevention
Generally, many water piping issues that are related to age are not preventable, especially if you’ve “inherited” problems from a previous owner or you happen to live in an old home that never had pipe work done.
Really, the best prevention is to re-pipe the home if you know you have very old pipes, and you’ll want to make sure the work is done properly by a reputable professional.
Depending on the quality of the water pipes and their joints or junctions, you should be set for around 15-40 years once this is done.
Unfortunately, re-piping the house is pretty messy (dry-wall, tiling, and potentially flooring and/or ceiling must be broken to access the plumbing behind it).
Thus far, we’ve only addressed this issue before moving into a new house or we know we have a bunch of major repair work to do simultaneously as it’s quite disruptive (though admittedly, sometimes you don’t have control over this timing).
Cost

We did a re-piping job when we moved out of our first home as we tried to prepare it for renting back in early 2014.
That job was a polyethylene (PEX) re-pipe job, where PEX is a type of hard plastic that actually facilitates the piping job due to its flexibility, and it costed us about $6000.
Right before we moved into our next house, we also did a copper re-pipe on a similarly-sized home, which costed us about $4700 in late 2013 or early 2014.
Comparing that cost with some of the price ranges that we encountered in our research, water damage repairs and/or re-piping can range from $1000 to $5000 with the national average being around $3000.
But like I said before, you kind of have to take those numbers with a grain of salt because of labor cost factors (which vary widely geographically) as well as inflation.
By the way, the next three expensive repairs and/or replacements are very related to this water system plumbing issue so there might be some overlap…
4. Shower Or Bath Remodel

Technically this is related to the water system repair described above, but we’ve learned the hard way that a shower and/or bath remodel is a very important job because it involves (you guessed it) water!
In fact, the shower is essentially like having an indoor rainforest in your house because moisture is everywhere.
In addition to the water coming out from the faucets and shower heads, the hot water also makes the room humid (i.e. steamy, which means there’s water vapor everywhere).
So if the bathroom is not properly built, then you could find yourself with a very unpleasant surprise behind the tiles and the walls many years after the fact! (read more about our bathroom remodel jobs)
Signs Or Symptoms
 is a telltale sign that the workmanship was not good and could introduce major problems")
While bathroom remodel jobs may seem all nice when it’s new, you generally don’t really start to see how good or bad of a job it is until a few years later when signs of wear and tear start showing up.
In hindsight, we were also very lucky that we found a great tile contractor that did the bathrooms of our rental (though it was after we had remodeled our primary home).
The thing that made us act was when we saw how the rental property’s bathroom held up to abuse caused by bad tenants (even outlasting the bathrooms in our primary home).
That was when we knew that we needed to act sooner rather than later on our primary home’s bathrooms even though the remodel job was done just seven years prior!
So how did we suspect our bathroom remodel job was botched? Here’s a brief summary of the symptoms we noticed:
- Cracks in the grout (especially in the corners and joints)
- Uneven tile placement (i.e. the tile was not “level”)
- Loose or flaked off grout
- Puddles on the shower pan (or shower floor)
- Bathroom starting to have a musty (dungeon) smell
Prevention

Sadly, when it comes to a bathroom job, if it’s not built right from the beginning, you either have to start over or you’ll have to deal with the consequences.
As far as dealing with the consequences, you really don’t know how bad the problem is until you see behind the walls, which requires a “demo” (i.e. short for demolition).
All I can say is that the sooner you do the bathroom remodel right the first time, the less likely your bathroom becomes a health hazard due to mold.
Cost
This was one job where the cost really blew up with inflation over time.
When we did our bathroom remodel on our rental home back in the early 2014 time frame, we paid about $7200 for both the master and guest bathrooms (including floor tiling for the entirety of each room).
Fast forward 7 years, and the master bathroom’s shower remodel and flooring costed us about $7500 while the guest bathroom’s floor and wall tile remodel costed us about $6800.
It’s hard to tell the cost of the primary home’s original bathroom remodel because it was part of a much larger job.

However, from looking at the progress payments pertaining to the bathroom remodel’s completion, it was about $8000.
Just imagine how if we had done the bathroom remodels right the first time in 2014, then we could have avoided nearly $14k to $15k of additional costs!
This is a classic example of what I mean when you’re paying full price with interest if you don’t do the job right the first time!
And this could have been worse had we not been proactive about “cutting our losses” and just eating the bathroom remodel just 7 years after the initial job.
That’s because we found mold starting to grow on the backer boards during demolition.
If that mold had spread to the wall studs then that could have really blown up the repair costs even more (see repair #10 below).
For context, as of mid-2022, the latest survey that I’ve seen of the typical cost of a bathroom remodel is on the order of $6000 to $16k with the national average being around $10k.
That just goes to show you how quickly costs have escalated due to inflation!
5. Water Heater Replacement

This is kind of a corollary to the overall water system repair, but it’s an important enough aspect of the overall homeowner experience to actually be treated as a separate repair.
Indeed, if you appreciate taking hot showers, then you’ll definitely need to make sure your water heater is working properly.
Unfortunately, this is also something that isn’t cheap and can be unreliable, which we learned the hard way.
If it’s faulty, it could also cause similar kinds of water-related issues as all of the above water-related repairs mentioned so far in this write-up.
In fact, unmaintained or faulty water heater tanks could result in a flood or even a fire!
Signs Or Symptoms
In our experiences, we suspect there’s something going on with the water heater if we start to notice the follwing symptoms:
- pilot light continually going out
- running out of hot water sooner (possibly too much sediment in the tank)
- no hot water whatsoever (or just lukewarm water)
- loud or unusual noises coming from the water heater
By the way, these symptoms are in addition to the water system symptoms that we identified in Repair #3 above.
Of course, we had to deal with a faulty water heater (that was barely 7 years old), and the tenants let us know about it (especially after a handful of service calls to repair it)!
In any case, at least we were fortunate enough to have a water heater issue be limited to just that (and not blow up into a much larger water piping related issue and/or complication).
Prevention
The following are things that we can do to help prolong the life of our water heater while also ensuring that it doesn’t cause flooding problems or explosions.
- Flush the water tank periodically to flush out sediments
- Check for rust in the piping
- Check for any gas leaks around the water tank
- Keep the area around the water tank clean
- Periodically check the water heater’s pressure release valve
- Go tankless and not deal with the water tank maintenance at all
Cost

Knock on wood, we’ve only had to deal with water tank issues as far as replacing an old one as well as a faulty “new” one.
Based on that experience, the first water tank we bought in around early 2014 was about $1000.
The second water tank we bought for that same house in 2021 was around $1800.
Compared to some price ranges we’ve seen as of early 2022, traditional water heaters installed including labor range from around $700 to $2100.
They’re supposed to last 10-12 years (though our first one we bought for our rental didn’t quite make that standard).
By the way, tankless water heaters typically cost $1000 to $3500 for parts and labor, and they’re supposed to last upwards of 20 years.
6. Sewer/Drain Repair

Technically speaking, the sewer system is a very specific part of the overall water system in your home.
The job of the drain pipes as far as your home is concerned is to move the wastewater from your home to the municipal sewer pipes beyond your property’s boundaries.
From there, the municipal sewer pipes will move the wastewater to a treatment plant before returning the treated water back to the environment.
It’s important to note that the sewer pipe within the property boundaries of the homeowner is the homeowner’s responsibility!
Sewer or drain pipes become homeowner headaches when there’s a clog or a leak that sends the wastewater into your yard or home instead of the municipal sewer system.
Signs Or Symptoms
You can generally get a sense that something is wrong with the septic system when you start to notice the following things:
- toilets won’t flush
- drains move water slowly (even without a strainer or drain stop)
- there’s standing water in the yard, and it smells bad
- toilets and drains have water backing up
We’ve had a few personal experiences with backed up drains.
In one such instance, it turned out that tree roots had grown into the sewer line, which in turn caused blockage that ultimately backed up the toilet and shower drains.
We managed to hire a plumber to probe into the sewer line (in much the same way as they do colonoscopies to probe your large intestine), and then he took action to remove the blockage.
In another instance, there was a clog that new tenants had experienced after the prior ones had moved out.
Unfortunately, we couldn’t tell what the prior tenants had dumped into the drains, but we suspected they dumped grease when they weren’t supposed to because we saw grease on the walls and cabinets during clean up.
At least the pipes weren’t in jeopardy, and it was basically another plumber call out and rooting that got the new tenants back into business again as far as the drain system working.
Speaking of the grease, that was one thing that could have prevented drain clogging, which we’ll get into below.
Prevention

Taking care of the home’s sewer line largely comes down to what you put down into the drain.
You really don’t want to rely on the garbage disposal to act as a filter, because it doesn’t do that (and it might create finer grains that eventually create build-up that clogs in the sewer line).
So here are the following things that we’ve done to try to prevent (or address) this problem.
- Use a strainer in the kitchen sink (for catching food particles)
- Use a strainer in the bathroom sinks (for catching hair)
- If washing dishes, use hot water to “cut the grease” (oil and fats solidify closer to room temperature or lower)
- Pour excess oil into a bag and toss it in the bin (bypassing the sewage system, else risk “clogging the artery”)
- Do NOT pour acid (or acid-based products) into the drain (it will corrode the pipes and cause leaks)
- Try to keep trees away from the sewer line (to prevent roots from growing into it via the joints)
In addition to the above steps, we actually installed a cleanout on our rental home because we just don’t know what kind of things tenants would be dumping into the drains so this would provide easy access for a plumber on the job.
Cost

It’s difficult for us to gauge the cost of sewer pipe replacement because we haven’t had to deal with that step.
However, we have had a plumber clear out the sewer pipe when roots had grown into it (and caused a backup), which costed us around $200 or so during the 2013 time frame.
That said, the cleanout (which was backbreaking labor) costed us about $2400.
As far as septic system repair is concerned, the average repair cost is said to be about $2500 for a new sewer line and about $600 for a new drain.
Of course, this doesn’t include the associated costs of any yard work if the sewage went into the yard, nor any mitigation work if sewage made its way into the house!
7. HVAC Replacement And/Or Asbestos Removal
 unit in a utility closet within our rental")
Since we live in Southern California, the HVAC system (which includes central air conditioning and heating) are well-used.
This is one of the most expensive units in the house, and the alternate is not having air conditioning during a heat wave or not having heating when we do have cold winters.
Just to quantify some of the temperature extremes we’ve had to deal with inside the house (and we have insulation), we’ve had to deal with upwards of 95 degrees Fahrenheit in the Summer and downwards of 50 degrees Fahrenheit in the Winter.
In addition to having an HVAC system installed, we also had to deal with city codes requiring that asbestos be removed (which were primarily used to insulate HVAC ducts).
So you also have to account for that cost (though we also managed to get rid of sound-dampening popcorn ceilings, which are also made of asbestos).
Asbestos fibers tend to remain in your lungs for life, but they’re only problems when they’re perturbed and you breathe in the fibers.
Another HVAC-related issue that we had to deal with was a rat infestation in the attic. (read about our rat problem here)
They compromised the air ducts by tearing into the insulation and using them as nests, which caused a condensation risk, a fire risk, and a disease risk (rat feces is known to carry the hantavirus as well as leptospirosis).
Signs Or Symptoms

If you start to notice problems or something unusual about the HVAC system, then you’ll definitely want to nip those problems in the bud as quickly as possible (or else risk having to replace the whole unit).
Here are some things to look out for that might point to an issue with the HVAC system:
- The HVAC is not heating when the heater is turned on
- The HVAC is not cooling when the air conditioner is turned on
- The unit is making strange noises
- The unit fails to maintain the temperature demanded through the control panel
- System has trouble turning on or off
- Rat droppings in the HVAC closet (a sign of rats in the attic chewing up the HVAC ducts)
- Musty smell of rat urine in the attic
Prevention

Given how costly an HVAC system is (the numbers are shown in the next subsection), you’ll definitely want to do what you can to make sure it runs for its typical lifespan of about 15-20 years.
Here are some of the things that can be done to that end:
- Replace the air filters often (some say 3 months but at least do it annually if HVAC used sparingly)
- Hire a professional to perform yearly maintenance
- Be vigilant about looking around the house for any signs of a rat infestation
- Forget about central air and use isolated heat pumps instead
Cost

We paid for an HVAC system on our first home back in the 2011 time frame (largely to make things more comfortable for my wife and newborn), and it costed us about $6000 at the time.
Unfortunately, we also had to pay for asbestos removal to be compliant with city code, which costed us $650 in 2011 (we also removed the asbestos-laced popcorn in the ceiling for $1800 in 2014 to be ready for rental).
Just to give you an idea of how these costs compared to the overall context of what everyone else seems to be paying in 2022, the average HVAC replacement cost is about $5000 to $10k while asbestos removal is from $500 to $4500.
The national average for both of those costs are $7500 and $1800, respectively.
Now we did have a rat problem, which compromised our HVAC system, and we had to mitigate the issue in mid-2021.
Rat removal, exclusion, and best-effort clean-up costed us about $3200.
HVAC duct replacement costed us $4200.

Finally, we have had a heat pump (i.e. “room AC”) installed in our office in the 2006 time frame (prior to having central air or HVAC system), and it costed us about $1000 for the unit and installation.
As of mid-2022, it’s said that heat pumps of similar size now cost between $3600 to $5200.
Indeed, this aspect of home maintenance and repair shows you how easily one issue leads to another, and it’s kind of hard to segregate and compartmentalize them as these expenses tend to bleed into each other.
8. Termite Mitigation And Repair

Most residences built in the United States (and especially Southern California) are made out of wood.
Irrespective of the true cost of lumber (because we see what an adverse impact deforestation has on Climate Change), it’s considered a “cheap” building material, which is why it’s so prevalent.
However, the wood used in construction is also deemed by Nature as “dead wood”, and Nature has a way of recycling dead life and returning their nutrients to the ecosystem.
Termites are the primary mechanism by which Nature returns the nutrients locked away in dead trees for the circle of life to continue.
These insects eat the dead wood (as it’s food to them), and if left alone, they can essentially eat away the structural skeleton of your house.
Much to the chagrin of homeowners, this natural process runs contrary to homeownership, where we are generally not adaptable to the constant changes that Mother Nature throws at us.
Hence, we’re stuck with either constant maintenance or huge repair bills in an attempt to “fight” Nature and try to remain in our home for as long as we economically and biologically are able to.
Signs Or Symptoms

By now, you will have noticed a recurring theme regarding homeowner headaches…
…you’ll want to nip problems in the bud before they blow up into something out of control!
In the context of noticing signs of a termite infestation, you’ll want to look for the following:
- wing clippings (left behind by flying termites or “swarmers” looking to establish a new colony)
- tap wood beams around the house and listen for any hollow sounds
- poke the wood beams around the house to see if the stick or screwdriver penetrates the wood
- mud tunnels (though these are hard to spot because they could be behind stucco and panels)
- termite droppings
- bubbling and/or peeling paint
You can read more details about how ignorance was not bliss in our situation in this write-up.
Prevention

Termite infestation is an ongoing threat to every homeowner, but it helps to know that a colony typically matures after around 5-7 years or so.
Knowing this information, you’ll want to do the following to be on top of the situation:
- Know when the last time the house was fumigated, and if you don’t know, just fumigate it
- Keep wood and mulch (as well as paper or other wood-based products) as far away from the foundation as possible
- Have the home inspected for termites annually
- Try not to have soil or dirt up against the house (they attract moisture and could compromise the neighboring wood)
- Treat raw wood with borate-based solution (e.g. boracare)
- Paint the exterior of the house after tenting (to seal up gaps as much as possible)
It’s also worth noting that spot-based termite “treatment” only works if you’re on top of your termite situation (typically after tenting), when you can see and stop new termite activity when a new infestation is about to happen.
If you try to spot treat your home before tenting, it’s kind of like pulling the cart before the horse because you may miss hidden colonies that you’re not aware of, and that renders spot treatment useless.
")
Speaking of hidden colonies, we should mention that fumigation only addresses drywood termite colonies, which tend to be established in the home’s structural skeleton via the roof and attic.
However, subterranean termites (a different type of species) establish colonies underground, where the gas from fumigation won’t penetrate.
That said, they can also eat their way up from the ground while insulate their passageways around resistant or non-wood materials with mud tubes (often times also reaching the attic).
To my knowledge, the most effective way to prevent or at least mitigate sub infestation would be to dig a trench around the foundation and fill it with a Termidor (or other solution fatal to termites), which creates a sort of “barrier” to the foundation.
Cost
 in progress")
As far as costs are concerned, eradicating a current infestation through fumigation costed us about $1400 to $1800 (over the years, we’ve gone through at least 4 of these).
Subterranean termite control (which fumigation won’t address if they’re underground) costed us around $600, but it can easily cost upwards of $2000 or more depending on how much trenching needs to be done.
There are also termite baits though their effectiveness is questionable (we tried it and it didn’t work).
Now termite eradication is one cost, but the larger, escalating cost has to do with termite-related damage.

Just to give you an idea of what that is, I’ve seen 2022 statistics that state the cost range for wood replacement can be anywhere from $500 to $7300.
That said, we’ve had to pay upwards of $6400 on our rental home and roughly $3600 on our primary home (both in the year 2021).
That didn’t include wood replacement that happened during the course of re-roofing, where we paid about $6600 on our primary home and roughly $1200 on our rental.
And that didn’t include shoddy and cosmetic “repair” work where we paid about $1400 for one company to make the problem worse in 2014! (details of what our structural repair person found are chronicled here)
9. Siding Repair

In addition to the roof, a home’s exterior walls (or sidings) are also subject to the elements (especially water), and they’re designed to protect the less-tolerant wood structures and interior from being exposed.
Most homes in our neighborhoods have a stucco exterior, and that’s primarily because it does well in hot and arid climates like Southern California.
Stucco is said to be one of the parts of the home that requires the least maintenance since it typically has a lifespan of about 50-80 years.
That said, we’ve actually had to deal with a situation where stucco was breaking apart, which caused the wood behind it to get moist while also introducing pests (like a persistent ant infestation).
We ultimately had to get it redone.
While I do recognize that there may be other types of sidings, we’re only familiar with stucco in our situation so that’s what we’ll focus on here.
Signs Or Symptoms
 is a sign of moisture retention")
Although stucco is said to be one of the most resilient parts of a house, it’s not invincible (as our experience had shown).
Here were some things we should have looked for and nipped in the bud:
- Emerging cracks in the stucco (coming from temperature swings but also could be a sign of a foundation issue)
- Chipping or fading paint on the stucco (a sign of moisture remaining behind the stucco)
- Damp exterior walls (a sign that moisture is remaining behind the stucco)
- Presence of powdery white substance (“efflorescence”) on stucco exterior (another sign of moisture retention)
Prevention

Although stucco is said to have a 50-80 year lifespan, there’s some maintenance that is required to take care of it as well as some measures to take to ensure stucco was done right in the first place.
Had we known any better and heeded some of these preventative measures, then we might not have needed to redo the stucco on our first home (which later became a rental).
Here are some of the things we could have and should have done…
- Paint the exterior of the house every 7-10 years (which could cover up hairline cracks from weathering)
- Install weep screed (if not there already) to let water escape from behind the stucco (also conforms to city code)
- Regularly clean the exterior (power wash on lowest pressure or spray setting with garden hose)
Cost

As of 2013, we had to pay $4200 to replaster the exterior of our primary home, which included a detached garage.
Afterwards, when we saw that there were water retention problems, which forced us to act by installing weep screed.
Note that we also did some masonry and drain work around the house to complement the weep screed, which we’ll get to later on in this write-up (see repair #12).
That weep screed installation and re-stucco job costed us around $6000.
With hindsight being 20/20, we could have put in the weep screed the first time we re-stucco’ed the house and saved ourselves having to do it a second time.
However, not knowing everything at the time is part of the headaches of homeownership, and that’s life sometimes in this buyer beware world.
For context, siding repair costs can range between $100 to $16k with the national average said to be about $630.
10. Mold Remediation

Mold is essentially fungus (for fungi) that can elicit allergic reactions in the upper respiratory tract (i.e. the lungs and sinuses).
According to the Center for Disease Control (CDC), mold primarily affects people in the form of allergies and trouble breathing.
While there’s unconfirmed claims of mold being potentially fatally toxic, this is something we don’t want to take chances with, especially with our rental home (where tenants might take legal action if adversely affected).
At the very least, control of indoor mold growth (since it’s so prevalent everywhere in Nature) can help improve quality of life.
Left uncontrolled, however, you could end up feeling like you have chronic cold-like symptoms, and it could be particularly hard on asthma victims.
Signs Or Symptoms

Mold primarily grows where there’s persistent moisture due to lack of ventilation to allow that moisture to evaporate.
Therefore, the presence of indoor mold growth is a symptom of some other problem that needs addressing (see all water-related repairs above).
Indeed, mold growth can happen anywhere there’s a water leak in the piping, a leak from the roof, water behind the sidings, water behind an improperly installed bath or shower, and standing water underground by leaking drain pipes, etc.
So if you see mold in or around the house, you’ll really want to understand WHY that mold is there in the first place!
Aside from the obvious visual presence of mold growth (e.g. in the bath or shower, behind the washing machine, nearby the water heater, etc.), it can still be there unseen.
So here are some things to look for regarding the non-direct symptoms of mold presence:
- musty odor (kind of how you might imagine how a dungeon might smell like)
- discoloration in the walls and/or ceilings
- allergy symptoms
- presence of cracks in the grout in the shower and/or bath
Prevention
As far as trying to prevent mold from becoming a problem, it really boils down to:
- taking care of leaks right away
- pay attention to the home’s humidity levels
- ensure there’s sufficient ventilation in the home (including vents letting air flow through the attic)
- inspecting the home periodically for signs of mold
Of course, as you can see from the previous 9 repairs in this write-up, there are layers of prevention to address things like leaks, water retention, etc.
Indeed, just finding mold is the first step in peeling back the onion, so to speak.
And covering up or bleaching the mold won’t solve the root cause of why they were there in the first place!
Cost

We’ve luckily dodged a bullet when it came to not needing to do mold removal on permanent structures in our home though we did have to take similar measures in terms of drying out behind-the-wall moisture before mold growth.
We also removed mold growth on backer boards on a botched bathroom remodel that we proactively redid (before that mold could spread to the wood stud holding up that backer board).
Therefore, we can only say that mold removal was said to cost between $1000 to upwards of $6000 with the national average said to be around $2200.
However, when we had to dry out behind-the-wall moisture (due to water intrusion from saturation rains in early 2017), we did stomach a repair bill of $1600, which included replacement dry wall after the abatement was complete.
11. Electrical Re-wiring And/Or Repairs

Electrical repairs can be a surprisingly expensive aspect of home maintenance and repair.
Typically, electrical work involves any number of things concerning the updating of electrical equipment and wiring to meet modern energy demands.
For example, the electrical panel may not be capable of handling increased loads due to our increasing consumption and reliance on electricity over time.
Therefore, old electrical panels may need to be replaced with more modern ones (something we had to deal with when we wanted to go solar).
Moreover, prior electrical wiring from prior generations of houses being built involved poorer materials and practices.
For example, there was a copper shortage in the 1970s, which resulted in many homes built during that time to use aluminum, which becomes brittle over time.
So if suddenly certain wall sockets or switches stopped working, there’s a good chance that old wiring had something to do with it.
In addition, old or not-up-to-code wiring can also result in a higher likelihood of house fires, where trying to keep water away from the house actually works against you (as everything is now essentially dry tinder)!
 of our rewiring work or else none of our other permits would pass inspection")
Speaking of code, in our experience, we’ve had to pull permits to have electrical work done, especially since having rooftop solar and roof work both required pulling permits anyways.
Once the city inspector was there, they also wanted to see a permit for all electrical work done as well regardless of who did what before.
It didn’t seem fair because some prior owner before us had used bad wiring and/or workmanship that no longer passes city inspection (or wasn’t even permitted in the first place).
But because the repair responsibility fell onto the current owner (us), we had to eat the permit costs and delays (on top of the original electrical task in the first place) even though it wasn’t our fault.
How’s that for an expensive game of hot potato!
Signs Or Symptoms
Here are some things that might be signs that you have a need for electrical re-wiring:
- circuit breakers tripping regularly (meaning something is drawing too much current or there’s a short)
- appliances shocking you (suggesting improper ground or a short)
- unexplained power surges causing your electronics to behave strangely over time (possible improper grounding)
- flickering lights
- visible damage to exposed wires
- burning scent inside the house (possible short or overcurrent situation potentially leading to a fire)
Prevention
In order to prevent an electrical wiring situation blowing up into a house fire or to modernize the home in general, here are some measures that can be taken:
- have an electrician survey the wiring for non-compliance
- upgrade the old electrical panel
- distribute the load (don’t plug in the high-powered electronics and appliances into wall sockets using the same breaker)
- at least cover bare wires with an insulation layer if not changing the wiring (reduces fire risk)
- install GFCI sockets anywhere it can come in contact with liquid such as the bathroom, kitchen, laundry, and exterior
Cost

This is difficult to quantify because this can consist of any number of small jobs where taken altogether can add up to thousands of dollars!
In fact, it’s said that electrical wiring can cost upwards of between $1000 to $6000 for a 1000-1500 square-foot home, where the national average is supposedly around $1100.
As far as what we had to pay for our most recent electrical jobs, they involved:
- $1200 for parts and labor to install a new electrical panel in 2021
- $600 for running additional lines from a new panel to the office in 2021
- $2800 for bringing the rental property wiring up to city code, including subpanel installation, proper grounding, etc. in 2021
- $1000 for installation of doorbell camera and perimeter surveillance cameras in early 2022
To be honest, there’s a ton of other “small” electrical work here and there done over the years, each costing between $200 to $1000 covering things like lighting and fixing non-working sockets, but there’s too many to list here individually.
12. Masonry Work

This is a surprisingly overlooked aspect of home repair because it involves anything to do with concrete, cinder, or brick, which are adversely impacted by improper movement of water.
Like with so many other repairs discussed earlier in this write-up, the highest priority masonry work involve the control of water.
If you allow water enough time to attack brick or concrete, they eventually dissolve.
The consequences of this action could be new pest entryways (e.g. subterranean termites) as well as possible changes to soil moisture beneath your foundation, which adds stress to it.
It can also impact your relations with your neighbors if you have a deteriorating boundary fence made of cinder blocks, for example.
Not to mention, it could also adversely impact your home’s curb appeal, which in turn, adversely impacts its property value.
We’ve also done concrete work as a preventative measure to keep soil away from the house walls as well as to prevent tenants (or even the stray seed) from trying to plant something they’re not supposed to right next to the house.
Moreover, our mason has also helped us to install rainwater drains to prevent flooding during heavy rain events, especially where concrete is involved.
Signs Or Symptoms

Like with so many other repairs discussed earlier in this write-up, the highest priority masonry work involve the control of water around the perimeter of the house and its foundation.
However, there are other problems involving tree roots, foundation issues, driveway issues, and even earthquake damage that manifest themselves in masonry intervention.
Here are some signs of things that would make us consider hiring a mason:
- persistent puddles in concrete after rain or watering (foundation or driveway)
- water stains in the concrete (foundation or driveway)
- cracks in the concrete (foundation or driveway)
- cracks or separating cinder blocks and/or bricks
- dirt and/or soil right up against the house and any other external units (like detached garage)
- bricks dissolving into powder
Prevention

In my mind, you don’t really prevent masonry work from happening, but you do try to use masonry work to preserve the longevity of the home’s structure (and value).
So here are some examples of the things we did to mitigate and/or prevent future headaches:
- removed planters and/or dirt patches next to the house and covered them with concrete
- added drains that moved water out to the street
- ensured concrete around the drain sloped towards it, especially where puddles tended to form
- regularly applying sealer to bricks (so water doesn’t dwell on and dissolve them)
Cost

There are actually numerous issues we’ve identified in both our primary and rental home that required attention.
However, we didn’t have the time nor budget to get them all.
So here are the associated costs of the masonry jobs that we did wind up paying for:
- $3400 for planter removal and concrete work around driveway in mid-2021
- $550 to replace and re-secure loose cinder blocks and seal brick facade in mid-2021
- $2000 for drain installation and re-concrete around them in mid-2021
- $2500 for planter removal and drain installation around perimeter of rental house in early 2017
- $2100 for concrete work around perimeter of rental house in early 2017
Just to give you an idea of how our masonry work costs compared to stated numbers in the literature, apparently driveway repairs cost between $300 to $4500 with the national average said to be about $1600.
By the way, in case you’re wondering what work still needs to be done, we still have dirt patches around the perimeter of our primary home that needs to be filled with concrete.
At the same house, we also have to break concrete and install drains where there are obvious signs of improper drainage of rain water.
13. Landscape Work

When it comes to landscape work, I’m basically talking about any kind of work involving greenery on the property (i.e. the front yard, back yard, and side alleys).
While we tend to think about landscaping the house as nothing more than maintaining the lawn and the plants around the house, Nature actually does quite a few things that can mess with your home.
For example, large trees can sprout roots that upend concrete or even the walls and flooring of your home!
You might realize that the existing water distribution system (e.g. sprinkler) may exacerbate the problems leading to expensive repairs already mentioned in this write-up (e.g. foundation movement, leaks, etc.) and would need to be redone.
Heck, we’ve even had issues with planting the wrong kind of vegetation.
By “wrong”, I mean that they grew so quickly that they were either difficult to maintain or started creating other problems (like becoming more inviting for rats or starting to crowd the walls of the house).
Signs Or Symptoms
Here are the things we’ve come to learn over the years that require landscaping intervention:
- Trees and/or plants growing too close to the house, detached garage, or overhead power lines
- Trees getting so big that its roots threaten the house’s foundation, driveway, and/or the sewer pipe
- Patch of darker grass (suggesting a leak in the sprinkler system)
- Broken or non-working sprinklers
- Persistent puddles in the yard
- Water meter spinning even when no water is running
- Cracks and/or lifts in the concrete
Prevention

Like with masonry work, we primarily look at landscape work to complement other work or repairs around the house as far as the proper functions are concerned.
We tend to de-prioritize curb appeal, and only address those later if they haven’t already been addressed by fixing the more pressing functional problems.
As a result, we’ve done landscape work as a preventative measure against home repairs by performing the following tasks:
- cut down trees too close to the house
- remove plants too close to the house
- plant drought-tolerant and/or drought-resistant plants (to save on water costs and prevent water-related complications)
- replacing sprinklers with drip irrigation or at least making sprinklers spray away from the house
- set up gopher traps in their known holes
Cost

I’ve come to realize that landscaping tasks (and associated costs) kind of go hand-in-hand with the masonry work that I just mentioned earlier.
So with that said, we’ve performed the following landscaping tasks over the years, and we show the amount of money that we paid for these tasks:
- $750 for removal of large trees on the rental property in mid-2021
- $1900 for backyard sprinkler installation, lawn re-planting, and drip irrigation in planters on the rental in mid-2021
- $150 for drip installation on the backyard planters near neighbors’ yards in mid-2021
Just to give you an idea of what other people have paid regarding landscaping, I’ve seen the average cost to be about $750 for tree removal, fake grass installation to be $6000, and about $2150 per acre for drip irrigation installation on average.
Final Thoughts / Conclusion
Do the math, and you’ll see that any one of these repairs (let alone a bunch of them added together) can easily wipe out any savings you may have and break your bank.
And as you can see from our 13 most expensive repairs we’ve spotlighted in this write-up, it seems like we are exhibit A when it comes to having to deal with the worst of a homeowner’s headaches.
Now while home repairs are a necessary evil of homeownership (even going back to ancient times according to Wikipedia), the unexpected surprises don’t have to be like the death touch from a grim reaper.
Just know the maintenance history of your home (much like how you should generally have a maintenance history of your car) so you can prepare yourself for upcoming repairs and replacements without being blindsided.
Save For Repairs & Make Sure The Job Is Done Right The First Time

To help with this preparation, it’s actually a very good idea to set aside some money regularly for a savings account geared towards home repair (i.e. a “home repair fund”).
That would at least minimize the chances of you having to take out another home equity loan (and start over on your borrowing) to finance pressing maintenance issues that need to be done immediately!
Moreover, if you do find yourself needing to do repair and/or replacement, then you’ll want to get the job done right the first time.
Don’t half-ass or cheap out on your home repair jobs, because more often than not, you’ll end up paying to redo the work plus pay for additional damages that resulted from not doing it right the first time.
Indeed, failure to get the job done right the first time is like you’re paying the full cost with a severe interest penalty!
Homeownership Is A Buyer Beware World

Anyways, I’ve been focusing this discussion primarily as if you’re a homeowner having to deal with these headaches, but the lessons learned here also apply if you’re considering getting into the housing market.
Why? Because if you’re looking to buy a home or even getting an investment property, it’s a buyer beware world.
For example, home inspections are really hit and miss (our experience has been that they miss or overlook a lot of hidden issues), and often times the buyer is not in position to insist on repairs or major work when trying to close escrow.
And if they do raise a stink about pre-sale improvements, then they might risk losing out on a competing buyer who doesn’t care as much (or aren’t as aware) in a seller’s market.
Then, there’s that unfair hot potato issue where hidden homeowner costs (particularly permit-related issues) left behind by previous owners will end up with the current owner having to foot the bill once repair issues are uncovered!
And as if that’s not enough, many vendors and contractors are not honest (yes, we’ve had our share of dealing with them).
Unfortunately, your only defense against this is word-of-mouth or the lessons learned from a bad experience (why I felt compelled to make this website in the first place).
At the very least, give serious consideration to hiring licensed and bonded contractors because they will have a standard to live up to while also enabling an independent third party to mediate disputes.
We’ve had personal experience with enlisting the CSLB or (California) Contractors State License Board to mediate disputes, but this wouldn’t even be an option if you’re dealing with an unlicensed contractor.
Isn’t There Home Warranty Insurance?

So if all this homeowner responsibility on doing preventative maintenance sounds a bit daunting, it might be tempting to get a home warranty insurance.
This is a separate policy that would typically cover major appliances (e.g. dishwasher, refrigerator, etc.) as well as some types of home repair (e.g. the HVAC system) when they’re beyond the inherent manufacturer’s warranty.
In return, you’d have to pay a monthly fee as well as a fixed (per incident) call out fee before getting into the particulars about the repair or service itself.
Well, in our experience, this sounds great in theory (especially when you’ve seen above how much HVAC systems cost to replace).
However, trying to collect on claims or make use of their service when something goes wrong was nothing more than a frustrating exercise in them hiding behind “improper maintenance” or “unusual wear and tear” or “pre-existing conditions”.
We actually cancelled our home warranty when we realized that we were cumulatively paying way more into our monthly premiums actual costs of service (where most repairs were denied due to the hard-to-prove aforementioned reasons).
Does Homeownership Run Contrary To The Natural World?
")
Now as much as I’d like to think I respect the environment (because I am a Nature lover), I’ve learned through all of these homeowner headaches that homeownership as a whole runs contrary to the natural order of things.
This is reflective of our perverse economic incentives and cost drivers that steer us away from working with Nature and towards “fighting” it.
For example, if you look at some of the measures taken to control cost in the home repairs given above, we’ve had to:
- cut down trees (to reduce pests, roots getting into piping, and roots breaking the foundation and/or driveways)
- pour concrete and reduce greenspace (to protect the home structure)
- fumigate to preserve “dead wood” to hold up the house
- move water away from the house to also preserve the “dead wood”
- planned obsolesence forcing you to discard your spare materials if you don’t have enough for a repair
- old material and appliances having no avenue for their re-use (resulting in an unsustainable demand to quarry, mine, extract, smelt, etc.)

In fact, we individually don’t have the capital to overcome our laws and our market to truly live in harmony with Nature (whatever that might look like in a world of private property and less shared land).
After all, our laws and our economics don’t account for the health and sustainability of the environmental as a core guiding principle and foundation of the rules that everyone needs to play by.
So we’re stuck with having to “go with the (artificial) flow” as homeowners, and trying to fix the political system is a lot like urinating against the wind.
Similarly, the rules of the game also seem to make it less advantageous to go through life without getting into the real estate and homeownership game either.
Indeed, whether you’re a homeowner or not, as far as the environment is concerned, we’re pretty much stuck between a rock and a hard place.
Is Homeownership Worth It?

The bottom line is that if you’re finding yourself barely able to afford a home, then it’s these maintenance issues that will definitely put you into a compromising position to be forced to sell or deal with the impacts of a non-functioning home.
Whether fair or not, this doesn’t even account for Climate Change-related extremes causing unforeseen major repair work or even total loss.
The following recent examples come to mind…
- “Atmospheric River” flooding in the Pacific Northwest in late 2021
- The deep freeze in Texas in early 2021
- Major droughts and wildfires throughout the Western USA that are worsening over the past decades
- Major Flooding in Southeast Queensland and Northern New South Wales, Australia in 2022
It certainly makes you question whether owning that home was really worth it, or whether it’s a product of perverse financial incentives resulting from twisted laws.
Indeed, homeownership is not for everyone, and such unexpected repairs and outlooks were the very reason why we started this website in the first place since we have the homeowner headaches to share with you!
Renovating a house is always stressful for the family, because of the work that usually takes longer, as well as because of the craftsmen who wait for days to come and finish what they started. I have a big house that always needs a little something to do. You have rightly said that the foundation of the house is of great importance for the good maintenance of the house in the future.
Yeah, foundation repair is scary.
But that point you brought up about contractors starting a job and then taking their time to finish after they’ve done demolition can really add unnecessary stress.
While on the one hand, I get the insecure work so they try to field as many jobs as possible, especially when new jobs come up while they’re working existing jobs.
However, if you’ve got coordinated schedules, that can be really problematic. The best defense against something like that is to not pay everything up front. Try to divide up the contract into milestones 1/3 or 1/4 apart.
You can pay as milestones are met. That way, the contractor is motivated to get moving if he wants to get paid. Also, it pays to be an involved homeowner because if you’re too hands off, I’ve seen and experienced contractors taking shortcuts that you don’t know about until much later when problems arise.
I had to get a whole new bathroom fitted about 6 months ago now. This is because all the tiles were coming away from the wall and it just wasn’t a nice bathroom. It was the same one as when I moved in so it was time to replace it.
But my word, it came at a cost. I didn’t think it was going to be as expensive as it was for it. I did want it nice and modern but that is beside the point, it still costs a lot more than anticipated.
Yeah, bathroom remodels are really expensive, and I think a big part of that has to do with the fact that it involves a lot of water. Definitely look out for workmanship issues though. I know we had to redo our bathrooms on our primary home when we realized how it was done way better on our rental. Little did we realize just how bad of a job that first one was!
Thanks so much for a post like this really. Repairing a home is usually a big responsibility. And in this post you have explained about the most expensive repairs and how to prevent them. Posts like this are very valuable posts. I repaired my roof the other day. It cost me a lot of money. Thanks so much for this post. I will definitely share the mail. Keep posting like this.
Thanks for the positive feedback. Hopefully, your home repair is only limited to the roof. I know ours started with the roof, and it blew up into something so much more!